

Maya integrates one of the most important Mental Ray feature, that can make you render billions of polygons. It's an easy and very effective way to populate your Maya and Mental Ray scenes with thousands of objects like plants and trees without overload your system. Your CPU, your RAM and your girlfriend will thank you because of the time you can save with this trick! Go ahead and start this free Maya tutorial.
TYPE: Free maya tutorial
CATEGORY: Render Maya tutorial, render Mental Ray tutorial
INTRO
Today we are going to take a look at Proxy Objects in Mental Ray for Maya. Have you ever heard about v-ray proxies? Well, Mental ray and v-ray proxies are the same thing with different names. They are used to render an insane amount of polygons in a single scene. Mental Ray proxies are often used to render scenes with hundreds of high-resolution trees and vegetation in a very simple manner. Mental ray Proxy objects are used in many situations and can give you a lot of benefits in terms of https://www.antoniobosi.com/https://www.antoniobosi.com/images/ usage and cpu load. They make your scenes lighter and faster at render, saving lot of https://www.antoniobosi.com/https://www.antoniobosi.com/images/ usage during maya render process.
WHAT ARE MENTAL RAY PROXIES?
Mental Ray Proxy objects are like maya instances. Mental Ray Proxy objects don’t really exist in your scene, in fact you can't modify or edit them in your maya scene. Each mental ray proxy is loaded during render time (it' called "on demand") instead of simple meshes (like cubes) that you use to position proxies inside your scene, once you hit render that simple cubes are replaced by full detailed mesh.
The cool thing is that you can use a simple cube to represent a 2.000,000 tris polygon tree. This will allow you to populate your scene with hundreds of cubes (trees), without worrying about maya crashes or mental ray's out of https://www.antoniobosi.com/https://www.antoniobosi.com/images/ errors. The maya renderer (Mental Ray) will manage these thousands of objects in a very performing way. The speed improvement will not be only in maya render process but also in your maya 3d viewport!
As we said one of the major benefit of proxy objects is that they are only loaded on demand at render time, just when they are absolutely needed for the render result. This can allow you to render much bigger scenes with the same amount of RAM on your PC: we are talking about BILLIONS of polygons rendered in less than 1GB of ram.
STEP 1: OPEN YOUR THE OBJECT YOU WANT TO BECOME A MENTAL RAY PROXY
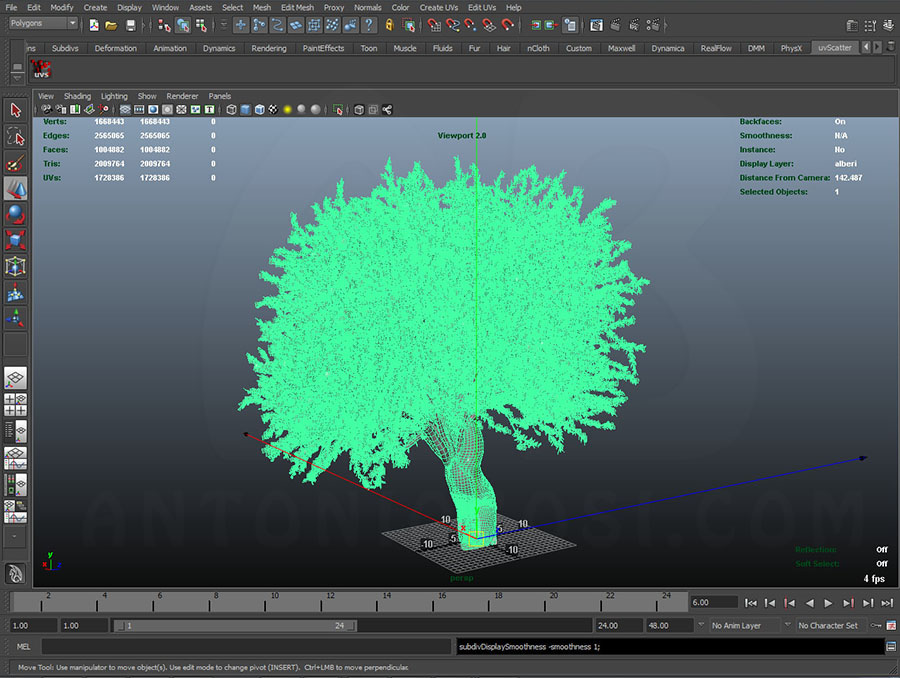
Open with Maya a scene with the object you want to make a proxy of. In my case, it’s a polygon 3d Olive tree collection for Maya and Mental Ray taken from my 3d olives tree collection.

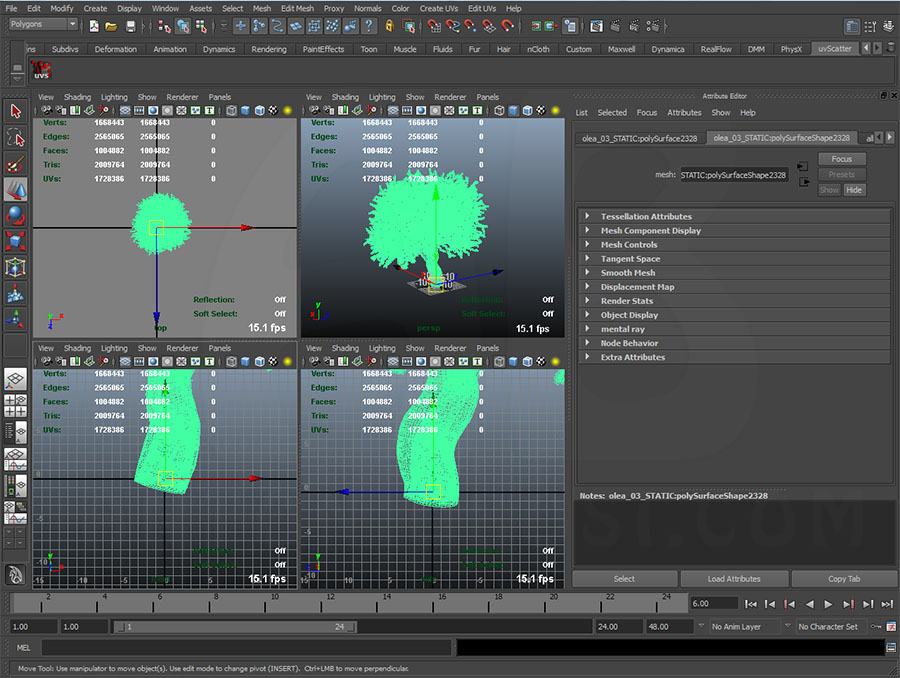
Be sure to setup shaders and textures properly. I advise you to combine everything in a single poly mesh to make mental ray optimize the proxy object.
Move that mesh to the grid origin (x 0 y 0 z 0) and freeze transformations.
As you can see it’s about 2 Millions of triangles poly mesh with complex shaders and textures, keep that in mind.
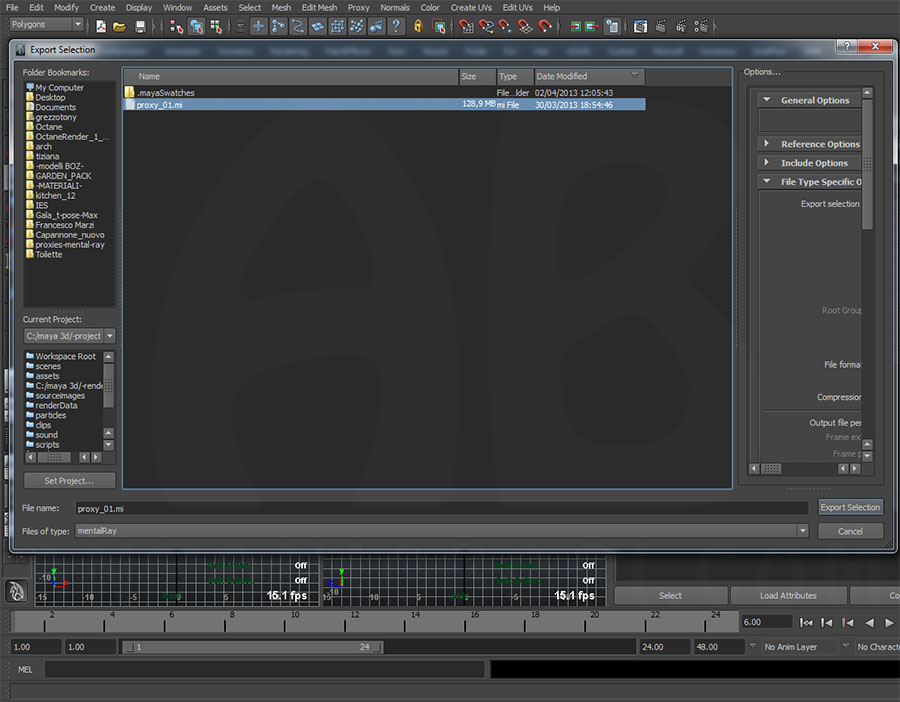
STEP 2: EXPORT PROXY OBJECT (the tree)
Select the poly mesh you want to export as a mental ray proxy object, then go to File>Export Selection and click on the small options box (Shown Below).
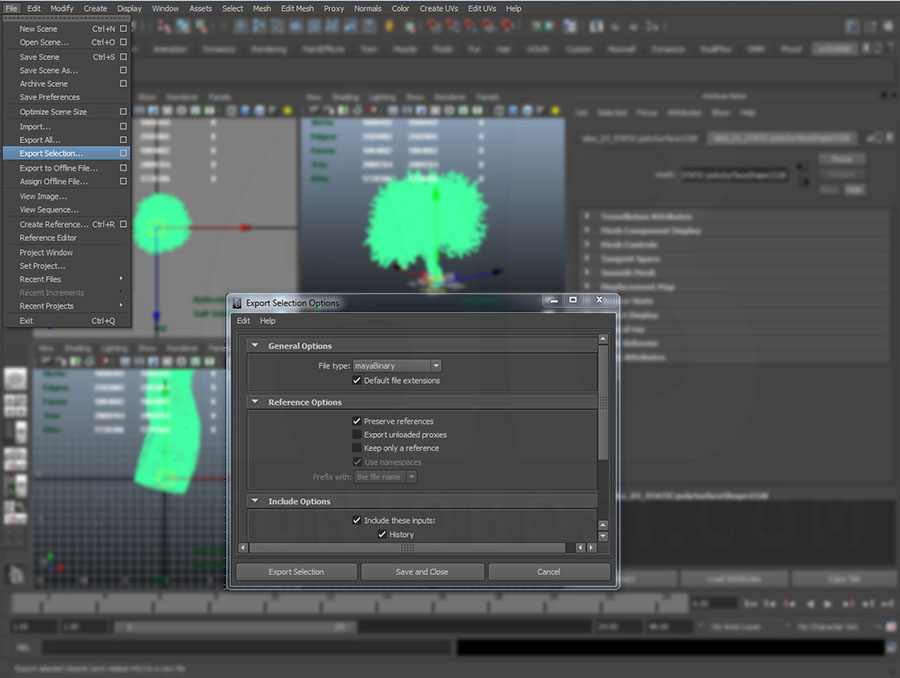
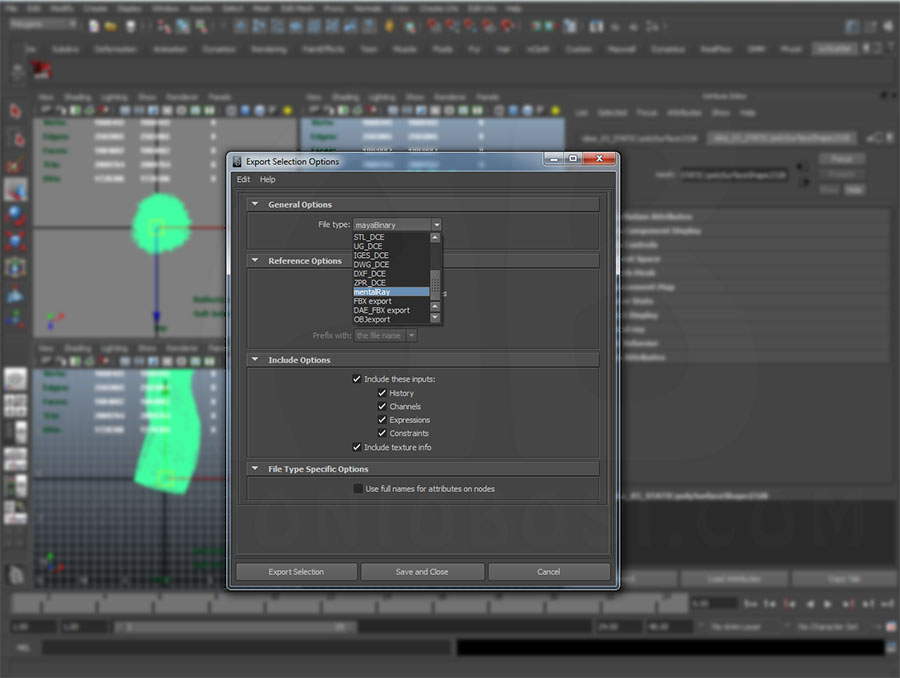
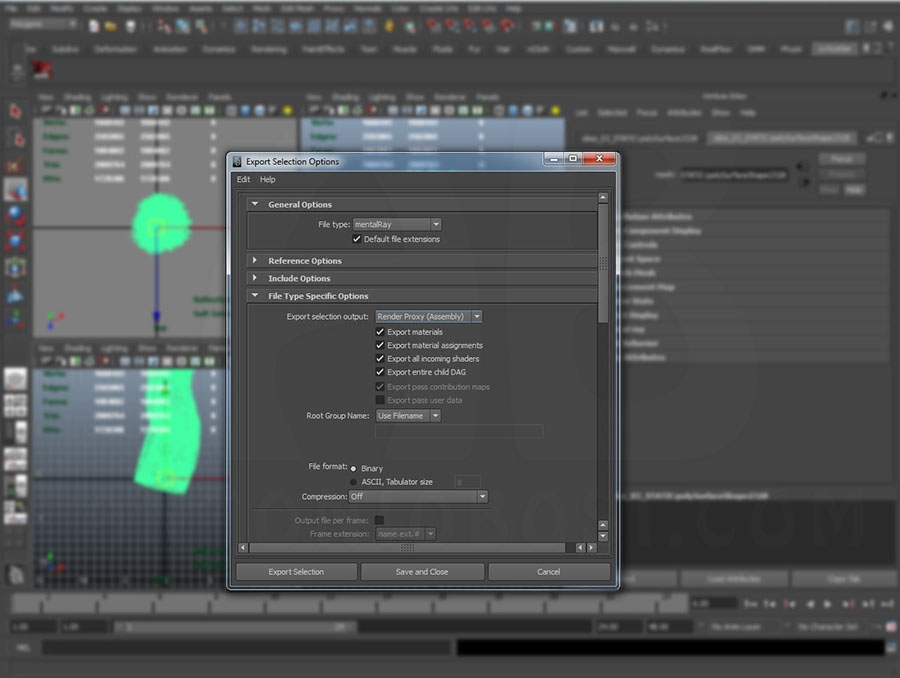
STEP 3: EXPORT SETTINGS FOR PROXY OBJECTS
In the Export window:
1) choose “Mental Ray” as “File Type”
2) choose “Render Proxy (Assembly)”as the “Export selection output” in the “File Type Specific Options” tab
Leave the other settings as they are. Now click Export Selection and give it a name to save.
Be happy, you have just created your first Mental Ray proxy object!
I've repeated this action for all of my 3 olea models.
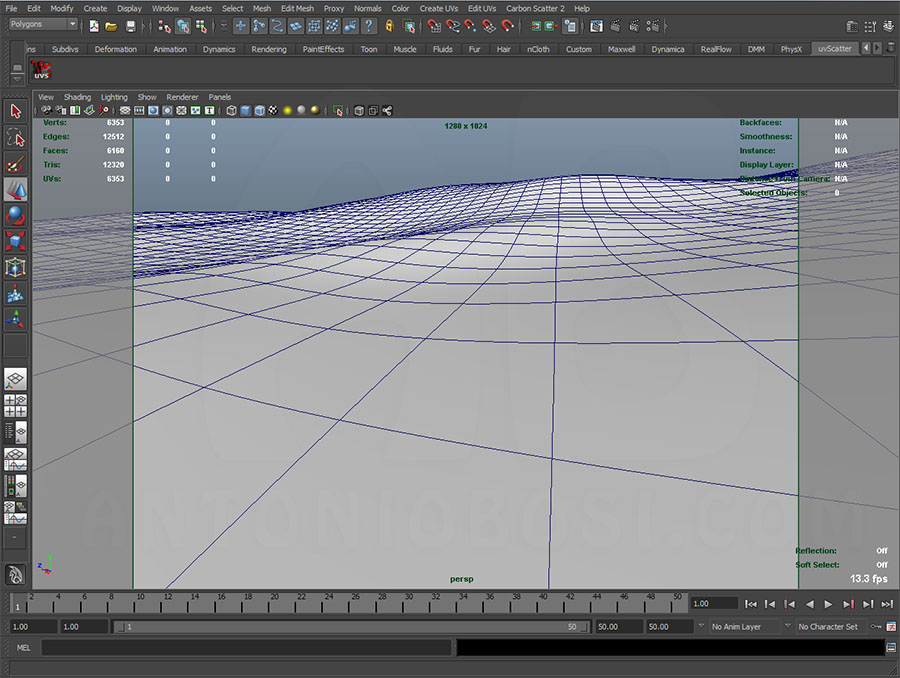
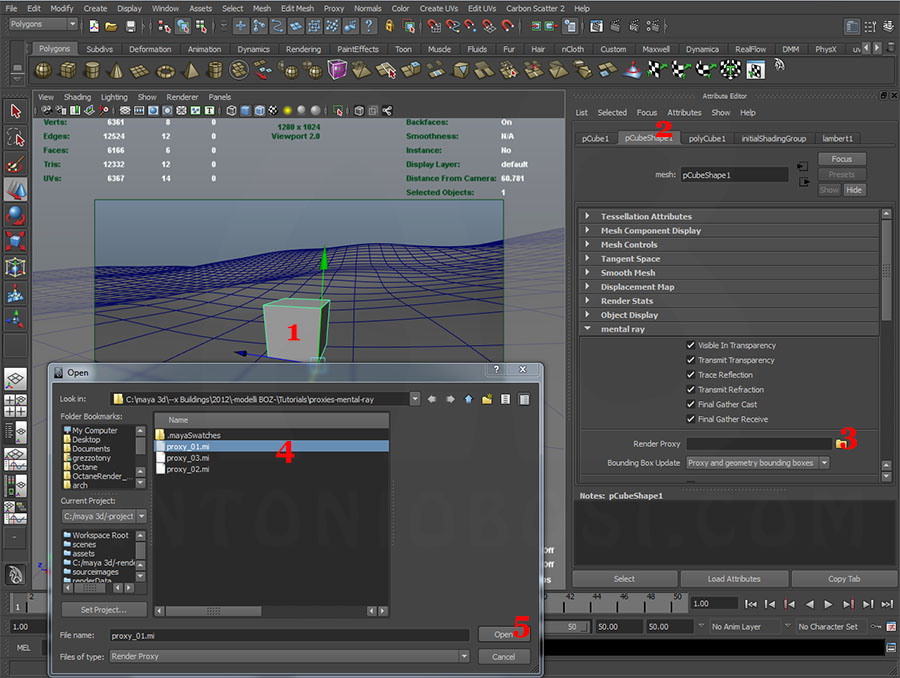
STEP 4: CONNECT PROXY OBJECTS TO A POLY PRIMITIVE
Now open the maya scene you want to populate with Mental Ray proxy objects. I’ve created a poly plane with variations in height and a grass texture.
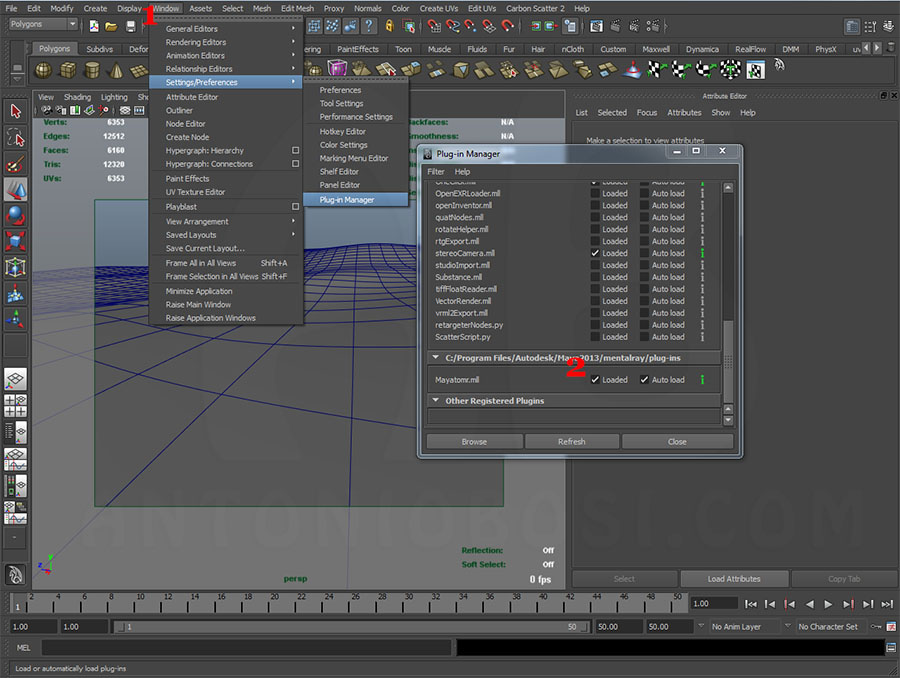
Be sure to activate Mental Ray for Maya:
1) Go to "windows" --> "settings/preferences" --> "plug-in manager" and activate mayatomr.mll
1) Choose “Render Using: Mental Ray”
2) In the “Quality” tab, under “Raytracing/ Acceleration” choose “BSP2″


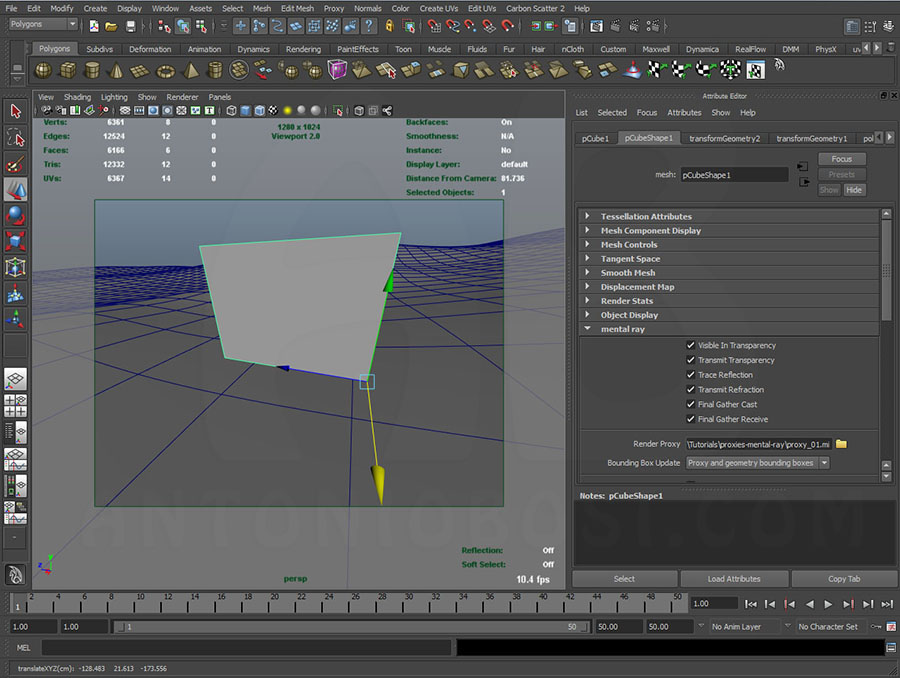
Create a simple mesh (I advise you to use a Cube) and hit the folder icon next to “Render Proxy” in the “Mental Ray” tab of the mesh’s shape node. Search and connect your previously exported proxy object. The cube’s shape and position will change according to the proxy tree’s volume shape.
STEP 5: RENDER MENTAL RAY PROXIES
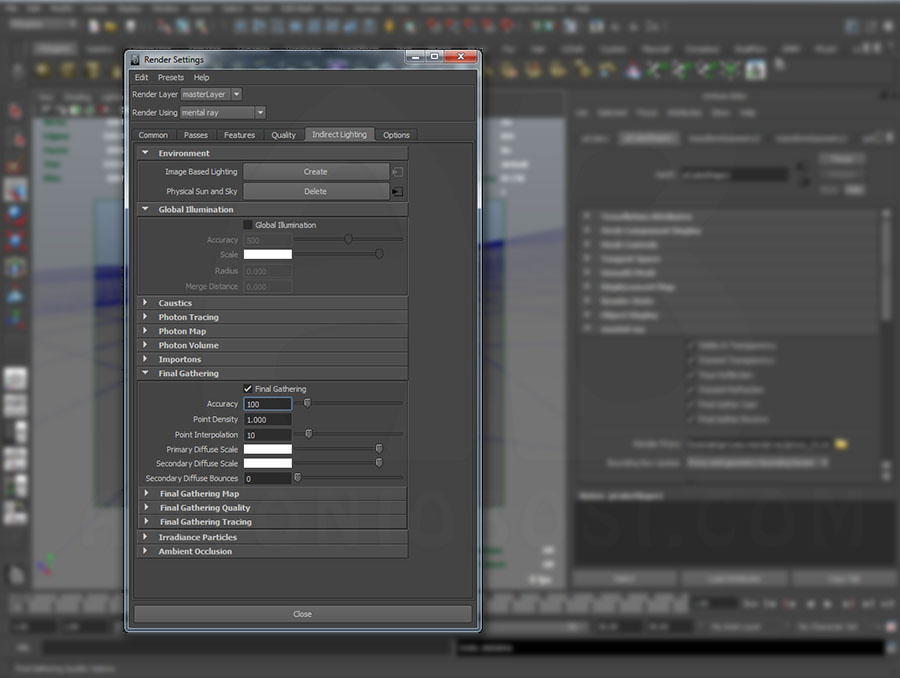
Let’s do a fast check: create a mental ray sun and sky node (under may mental ray render tab) and hit render.
You will see a tree instead of the cube... is it not great ?!
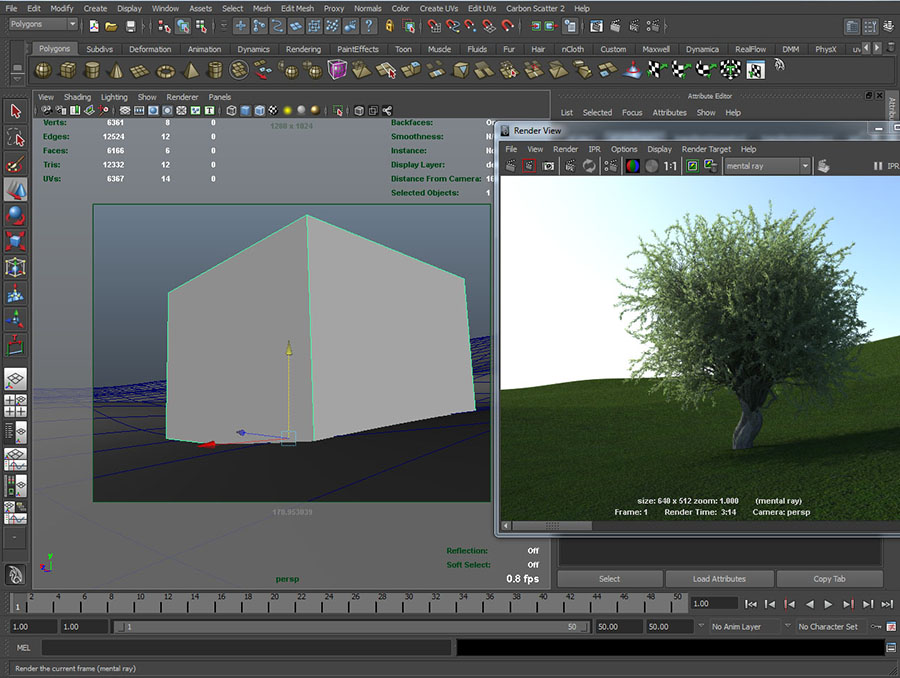

Mental ray told me:
current mem usage 431 MB, max mem usage 534 MB
triangle count (including retessellation) : 2206884
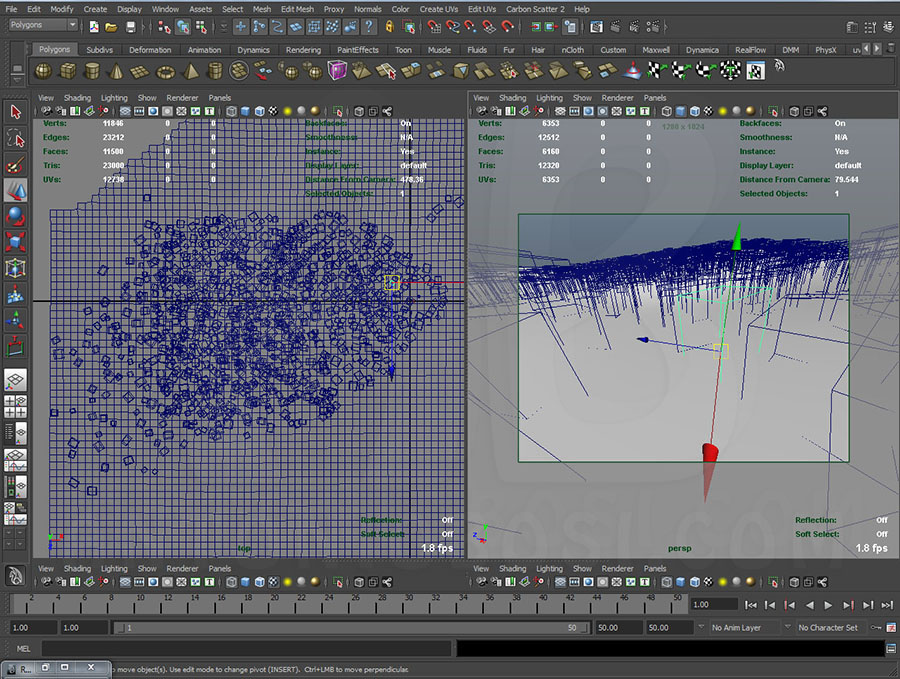
Now you are ready to populate your scene with your cubes (trees) and make a little woods just copying and instancing that initial cube. The tree which I showed you is about 2.000.000 triangles, so if you use ten of that trees and a couple of other detailed models, you can easily get a few million polygons. By keeping such high poly objects as proxy objects, you can easily navigate in your scene and include the full resolution models of your main objects.
STEP 6: CREATE YOUR LITTLE FOREST
You can adopt two main ways to create copies of your trees: copying and instancing. Instancing is very good way to save https://www.antoniobosi.com/https://www.antoniobosi.com/images/ but sometimes it could be difficult to change proportions and scale of your proxy objects. I advise you to use both that methods in conjunction. Don't forget to rotate and scale your "cubes" to avoid noticeable repetitions.
STEP 6.1: INSTANCING/SCATTERING OBJECTS IN MAYA
Here's one of the weakest point of Maya: Autodesk have never developed an easy tool to make us able to scatter objects in a fast and realiable way.
We (poor maya users) can't benefit from the power of 3d Studio's awesome scattering plug-ins like Forest Pro.
What can we do then? Right now our choices are:
1) Manually scatter/scale/rotate/manipulate objects around the scene
2) Buy a Maya scatter plug-in like "Ninja Mesh" or others
3) Create an instancer particle node.
4) Pray god to wake autodesk about scattering limitations.
Any of these choices have pros and cons. I still haven't found the "final solution" for this problem. We'll discuss deeply in a next to come tutorial:
Scattering objects in Maya.
MENTAL RAY PROXIES LIMITATIONS:
Right now Mental Ray proxies seem to be a little "experimental", I know, they were introduced many years ago but they still have limitations and bugs. The main limitation is that Mental Ray Proxies doesn't support multipass render. This can be very limitating in a professional render pipeline. If you don't care about that (I care 50-50) you are safe....even if you don't discover a new mental ray proxies bug!
CONCLUSIONS
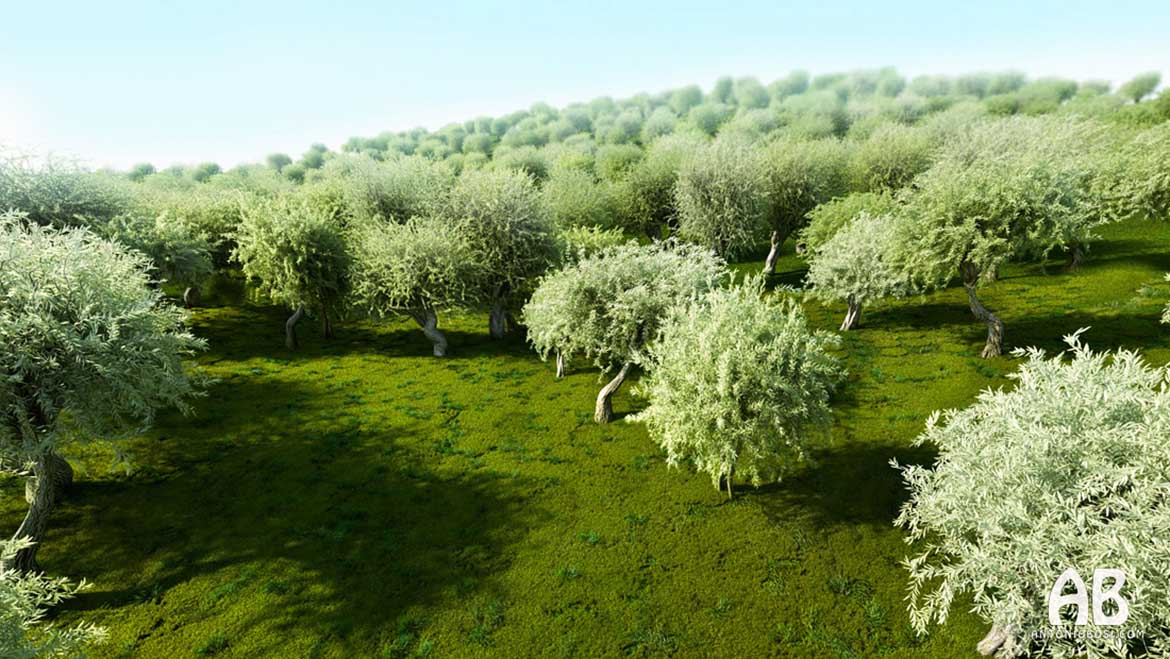
This render consists of about 200 visible instances of the mental ray proxy tree, for a total of about 400.000.000 rendered polygons. What about the https://www.antoniobosi.com/https://www.antoniobosi.com/images/ consumption? Take a look at the maya render log window... as I promised mental ray did an excelent job!

Make a little comparsion copying 10 or 20 of these trees in the "traditional way", now look what happen when you hit render....
After that you'll be ready to say with me: "Mental Ray Proxies, I love you".


52 thoughts on “Maya Mental Ray Proxies tutorial”
A VERY THANK U FOR GREAT TUTORIAL..I HOPE WE WILL GET MORE GREAT TUTORIAL LIKE THIS.VERY SOON
is there any way we can render matte passes with MR proxy…???
Your tutorial is amazing, thank you! The red numbers on top of your screenshots make it very easy to follow. I would also like to learn how to make grass like yours. Do you know where can I find a good grass tutorial?
i would like to use different computer to render with render proxy but when I reload the location of the proxy mi. so the obj are all relocated to the defult position, do u have any idea can figure out this kind of situation , thanks.
Hi Antonio,
thank you for this tutorial.
I have a problem when I import a proxy tree into a color management scene.
How can I fix it?
Thanks!
Hi mate, what’s the problem?
Ops.. sorry, I didn’t explain it :-*
When I render the scene my trees have a different light, they are brighter.
Is there a solution? :sigh:
Fortunately, there is a simple solution:
before you export the proxy mesh go to the file nodes an set the correct color profile (probabily you have to set sRGB). It should work! 😉
Yes.. it works! Thank you very much mate!
And congrats!
hi, may I ask is the trees are from maya paint effects?
Yes 😉
Hi! Wonderful tutorial, but I have a question: how can I modify the proxy model after the export?
I don’t know how import it in maya.
Best regards.
Hi Mario, to work with proxies is a little different than classic “import method”. You don’t import anything, you just connect a simple primitive to the external proxy file (see STEP 4).
If you need to modify your proxy you just have to open the maya (.ma or .mb) proxy file, modify as needed and then export again to the .mi proxy file.
The main scene will automatically read the new file and your placed proxies will be refreshed.
Cheers!
hi i tried this tutorial and it worked halfway….the first tree i created came out perfectly but the others came out as stumps how do i solve this please
Use DUPLICATE SPECIAL (click in the little box on the side and check “instance” in the option box). Then move your duplicated proxies.
hi I tried your tutorial and it worked used the move tool to scatter it but its only the first tree i created that is showing the rest are showing halfway with no tree top how do i solve this please
hi my name is rahro
rendering very nice but render by mental ray(maya)or mental ray program for rendering
Maya and Mental Ray (maya built in plugin) 😉
Hi Antonio,
Actually you’re a bit wrong, Maya has a geometry scatter tool since a long time. It’s a MEL script included into the basic Maya package, but it’s strangely hidden. Go to Modify>Script Paint Tool options and type geometryPaint next to Tool Setup Cmd. Here are some interesting info about this (and about particles too): ndhaussy.free.fr/maya_object_spreading/
Another solution can be the use of braverabbit script: https://www.braverabbit.de/playground/?p=474
Cheers,
Fabrice
Hi Fabrice, thx for posting. Here’s my thoughts:
1) Paint Geometry Tool: I think it’s a horrible tool that’s why I don’t mention it, when I tried to put this tool in my production pipeline it has been always frustrating.
2) The others methods are valid (particles, mel scripts and animation baking) but they are very poor, limited and time consuming compared to other software’s tools. I expect more from a 4.000€ software.
3) polyScatter is promising but unfortunatly when I tried it I had some kind of incopatibility and It didn’t work at all (did you have any issue?)
I tried Carbon Scatter and it’s very cool, anyway It’s not a “native solution” but, right now, it seems to me the only decent solution for maya and mental ray/v-ray users.
All the best,
Antonio
hi, I have followed the tutorial, and had success with the proxy.
But what is the work around when I want to add a depth and ao pass to the proxy?
Thanks!
You have to use a little trick explained here:
xhttps://www.tokeru.com/t/bin/view/Maya/MayaMentalRay#Proxies
The trick is Maya Particle Instancer
I try to avoid instancing as much as i can because maya instance is really slow to load because of the shadingEngine connections. Any scene with a few thousand instances would take >15min to load. Instead I would use maya particle instancer for the proxies. Any animation done would be on the particle expression.
The thing about mental ray is, once a ray hit the bounding box of a particle instancer, it will load all the instances in the particle. It’s okay if you have a few thousands particle, but if the particle count is more than let say 100k, it would take more time to convert this particle instancer from maya to mental ray.
To speed things up, I would separate the particles into regions of 5k-10k particles so mental ray would not load everything all at once.
I did a whole town vegetation with hills and what not. 10 type of about 2 million poly trees with 2 million proxies. I break up the particles into few hundred patches. Then, depending on the camera, I would animate the visibility of unseen patches. A frame would take around 30m to 2 hours depending on cam angle. (on a 16 cpu 24gb ram)
The whole setup took half day. Of course these are not done by hand. I’ve written a few scripts to populate the vegetation with particle and break surfaces into patches. I think CreativeCrash has a few scripts on particle instancer. And now with maya XGen I think this would be much easier(?). But since we haven’t upgraded I pretty much stuck with my own script. Here’s an old demo. https://www.youtube.com/watch?v=Qx1DH2R6Hz8
what if we refer proxies with controls that are moved. we have a system in place where we have referenced assets that are moved using their controls. These are swapped with their proxiy cubes with same cubes while they progress towards render. This is a better approach in terms of scene file loading. But for rendering is this a better approach or do you feel that instancing could further reduce memory load instead..
In this case I think using proxies or using instancies is equal.
Proxies has far better performance in terms of scene loading (as you said) and has other advantages when you need to replace/modify your referenced assets. For example you just need to modify your objects only one time to see them updated on all your proxies in the main scene. Using normal instancing technique you have to manually replace every single object with the new ones.
Anyway in terms of render performance (render time, memory consumption) I think proxies and instances are almost the same!
Actually MR proxies can be rendered in passes.
http://www.tokeru.com/…/MayaMentalRay#Proxies
I think he covers everything about MR proxies.
Follow the “::” tip. It works.
Thanks! I’m having bounding box issues that are sporatic. I’m starting to think that Maya doesn’t like my GPU. -Dan
Very interesting link, I’ll add the tokerus’s extra tricks in this article so the people will be able to find everything about proxies in a single page! Thx for posting
Hey there! I’ve followed all of the instructions to a “T”. I still can’t get this to work. My cube resizes, so I know Maya is getting the proxy information. I was getting a bounding box error, but that was resolved. When I render, I can see the ground plane, but otherwise there is nothing. No cube, no proxy, nothing. I really need to get this to work for a job interview, so can someone please help me out? Thanks!
Hi Dan, sorry for the late response but I was out of home/work these days. You could try to send me your scene with the proper proxy file (.mi and .mb)…I could do a sort of debug to see what is wrong.
how to render passes ?
Hi, unfortunately I don’t think MR proxies are able to render out separate passes…
so do you know how to replace multiple proxies i can replace 1 by 1 but its waste my time, thanks
You could try Replace Object command (in the modify menu)…it should work fine
8) Bookmarked! MR proxies saved me.
Thanks for your tips, they are really useful, I like the grass you get in your renders, can you give us any tips on how to get a grass like that. Tanks in advance for any help.
Hi Claudio, making grass in maya is something that depens alot from viewing angles. In this case we have an high-angle view so I decided to use a normal map + displacement and some real 3d grass chunks. Hope it helps!
Antonio
Thanks Antonio, again your comments are helpful.
bro thank you for this. sincerely
Great tutorial !
I’m a 3D student and I’ve been looking for so long a clean and simple tutorial which will allow me to easily manage forest and fields renders within Maya.
Looks like I found it !
So, a huge thank you 🙂
Thx Jaykill! Stay tuned, I’m going to release a related tutorial soon…. 😉
Hi Antonio,
It’s great tutorial, but I have a problem.
When I import my proxy object to an empty scene then everything is fine, but when I do this to a scene that I working on, my tree disappears. It’s a big exterior scene with Physical Sun and Sky with default options. I can’t figure why that happens.
I will be grateful for help!
Hi Maciek, when your proxies disappear?when you assign it to the mesh or when you hit render?
Have you tried to create the tree proxy in an empty scene, save that scene in mb format then import that scene in your exterior scene? Maybe it could work.
Thank you for quick answer 🙂
I have imported the mb scene with proxy and it works good. With low quality render it is small difference, so it certainly will helps me later 🙂
But there is other difference. When I import scene with proxy object it has different lighting than when I import scene with tree object. Here is what it looks (tree on the right is an proxy object):
https://www.dropbox.com/s/jpql93qr3g6bilh/example.jpeg
Thanks in advance 🙂
I think it’s something related to texture’s color management. Do you have activated it in render options? Try to disable/enable it or change the color management attribute from the texture node (from linear to srgb or viceversa). Let me know 😉
Right, I forgot about it! 🙂
Thank you for the help and of course I’m waiting for new tutorials 🙂
thanks for the tutorial! couldn’t you create a custom paint effects brush in maya to create the instances?
Hi Lucas, I couldn’t use maya paint effects because it doesn’t make instances. Paint-fx create procedural generated geometry, that uses a huge ammount of memory. You can’t populate complex scenes just using pfx brush, anyway its a good idea to use instances, proxies and pfx togheter to achive more interesting results.
Hi Malka, I think it should be avaible since the end of this month. Thanks god I’ve a lot of work these days, but I’ll try to find some free time! stay tuned 😉
when can we expect this tutorial?
Tutorial up malka16