

In this Free Maya Tutorial we are going to take a look at an effective and quite simple technique to achieve realistic clouds in Mental Ray Physical Sun and Sky inside Maya. Adding clouds can greatly increase the appeal of your renders. If you want to do realistic exterior renders in Maya and Mental Ray you can’t miss this article!
TYPE: Free maya tutorial render
CATEGORY: Maya render, Mental Ray Render
INTRO
There’s a lot of mess about how to obtain cloudy skies in Maya renders with Mental Ray Physical Sun and Sky. I read many maya tutorials about that but none really worked properly so I decide to make one myself…hope it will help you in your render creations! We are going to talk about 3 effective and quite simple methods to achive realistic clouds with Mental Ray renderer and Maya. Anyway in the last method (the third) I make deep explanations because I think it’s the most convenient than the other two. Let’s get started!
WHY I NEED CLOUDY SKIES?
The answer is simple: if you are trying to achive realistic renders you need details, then you have to take care of your skies as much as your ground.
Doing some “cloudy work” can massively enhance your renders…the render below wouldn’t be the same without a nice background sky!

I collected 3 main method to achive cloudy skies, I called them:
1) Internal
2) External
3) Hybrid
METHOD 1: EXTERNAL CLOUDY SKY (compositing)
The external method is the most popular and simple, just render your exterior scene with the proper alpha or matte channel and composite the final image with your favourite 2D composition software (photoshop, after effects, nuke, ecc..).

External method: the background sky were added in Photoshop

Windmill 3D model rendered in Maya + Alpha mask + Background sky image
When working with composited external skies you should always keep in mind that the sky does not really exist in your scene, this will make your scene render fast but you won’t render reflections and refractions properly….. take care!


External Cloudy Sky Method: no reflections and refractions of the sky are rendered
External Method Summary
PROS:
Very fast, no additional rendere times because the cloudy sky doesn’t really exist in the 3d scene
Easly customizable, you can easly change the apparence of the sky with external applications
CONS:
No reflections: the sky will not be present in reflected surfaces
No refractions: you won’t see the sky in your transparent surfaces
No real light contribution: the external sky will not cast or recive light, the overall appearence
of the rendered light will not be influenced by the external sky (you will always get a
clean day illumination type even if you put an overcast sky)
METHOD 2: INTERNAL CLOUDY SKY (all 3D)
I’m not a big fan of the internal method because its very time consuming: basically we have to create and render the entire environmental sky inside Maya. This “brute force” approach will give you the most realistic result but it will take a lot of time in creating, tuning and rendering.

With the Internal cloudy sky method you won’t have problems with reflections and refractions, you will also get realistic illumination and shadows.
To build real 3D clouds you need to use and master dynamic particles or fluid effects, you can find tons of tutorials in the net.
I created and setup a fluid system to obtain clouds, I put about 10 mins in creating and tuning my clouds (not a big time) but my render times gone crazy!!

No clouds: render time 2:20 min Real 3D clouds: render time 21:51 min


Internal Cloudy Sky Method: reflections and refractions of the sky are rendered properly
I advise you to use the internal method just if you must (like when you have to render an animated 3d environment with animated clouds).
Internal Method Summary
PROS:
Realistic reflections and refractions
Physically accurate lighting
Animation capabilities
CONS:
Lots of work: You have to create and tune the entire environment inside Maya.
High render time: volumetric effects are famous for their crazy render times!
METHOD 3: HYBRID/FAST METHOD

The third method is an hybrid between the internal and the external method: we use an external sky image to drive the internal rendered sky.
By the way this is my favourite method.
STEP 1: find a good panoramic sky image
First of all we need a Cloudy Sky Image (download here for free), HDR images are advised.

STEP 2: create Mental Ray sun and sky system
Open your scene and create the Mental Ray’s Sun and Sky from the Maya render settings.

STEP 3: create and connect Maya and Mental Ray nodes
Create these nodes from the Hypershade:
1) luminance
2) multiplyDivide
3) mib_lookup_spherical

Connect those nodes as follow:
1) luminance node to Physical Sky’s multipler attribute

2) multiplyDivide to Luminance

3) mib_lookup_spherical to multiplyDivide’s input 1

4) sky texture file in the mib_lookup_spherical’s Texture attribute

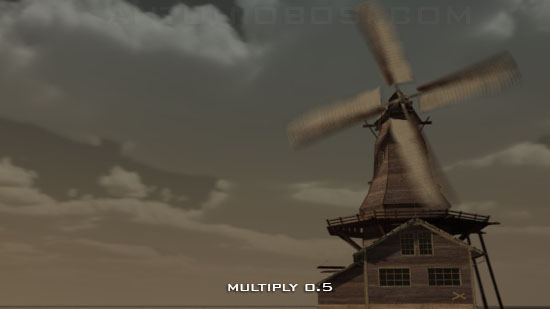
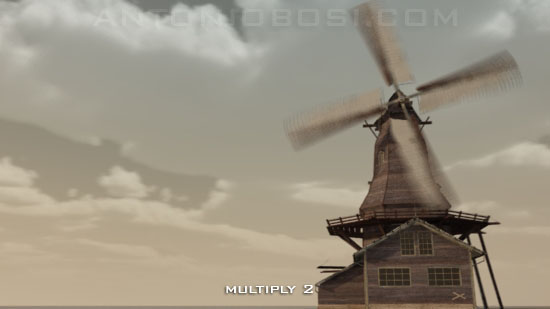
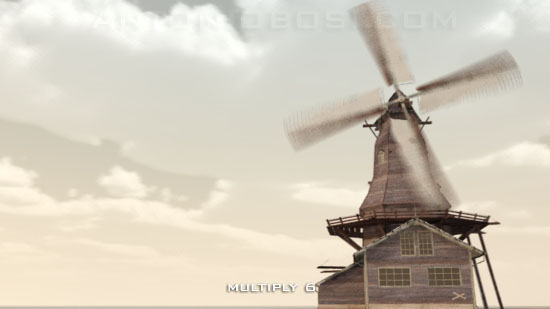
STEP 4: tune the multiply node
We need to pump up the values of the multiply node (try some vaues between 2 and 10), high values can generate burned areas and artifacts.


STEP 5: tune sun position
Hybrid cloudy skies can follow sun, just find the prefeer position of the Mental Ray sun node, the sun will be rendered behind the clouds!

STEP 6: experiment other Maya texture nodes
You can use other types of textures to drive physical sun and sky clouds. In this example I use a the maya fractal texture node.
.jpg "Mental Ray physical sun and sky in Maya: connecting fractal node")
Using fractal node will give you lower quality results, but you can easly animate the fractal clouds to create some interesting effects.

As expected the hybrid cloudy sky method render Refractions and reflections properly.


Hybrid Method Summary
PROS:
Reflections and refractions are 100% working
Fast render times
Easly customizable in post-production
Realistic light contribution
CONS:
Possibly view dependant artifacts
Not 100% physical accurated light contribution.
FINAL WORDS
Hope you had fun reading this Maya render tutorial. Feel free to make some questions or leave a feedback!
Antonio


40 thoughts on “Clouds in Mental Ray Physical Sun and Sky”
Good stuff,i want your help in my career
Thankz Broz 🙂 🙂 🙂
How can I lower the horizon line on my camera? I want the clouds and sky to be lower.
Hi Chris, just change HORIZON HEIGHT in the PhysicalSky node.
Take a look at this other tutorial for more informations:
https://antoniobosi.com/maya-free-tutorials/exterior-render-tutorial-maya-mental-ray
very instructive tutorial. So I skipped a step how you plug the HDRI sky picture?
Hi moha, it is the step 3.4. Inside the mib_lookup_spherical node you can find a Texture slot. Put the image file there!
Thank you Sir
hands down best tutorials on the web, thank you so much!!!
Antonio, set up the clouds, but in one render i did the clouds seemed very close to the camera and therfore obviously blurry poor image quality. Any chance you know how to fix this or how to control distance of the image from the camera?
Thanks, gh
Excelente!! le agradezco mucho
another great tutorial. The hybrid method works perfectly, and so fast! You really should make tutorials for all your work, excellent clear explanations.
Really it’s very useful to me.
thanks for this, great site and its help to me.
It’s really useful to me
I want to know, can I use these methods in interior works? Is there will. Have any problem face in interior lighting?
Hi Joseph, you can use this method for interior too. You can also put some area/portal lights to make the interior looks brighter.
Awesome tutorial, very helpful. One issue though, when I save a render and then reopen it (in photoshop) the sky is no longer visible. Any ideas?
Hi, it is related to the transparency/alpha channel of your output file. To make it simple just save in TIFF16bit and you will conserve the background, then take a look at the alpha channel (inside photoshop) and you will find a very useful cutout map also!
I did realise what was happening eventually! Thanks! Love your site by the way. I’ll be referring to it for assistance regularly. Straight into my bookmarks 🙂
ok, sorry, now i found it.. thanks
hi, I couldn’t find mib_lookup_spherical node in hypershade, but I found mib_lookup_background, is that the same? my maya version is 2013. Thank you.
Awesome! I love it! 🙂 8)
I’m having some issues with how the clouds appear in the spherical lookup whenever I do render view it just appears as if I’m renderign from outside the spherical view with clouds in from of what I’m trying to render. Am I missing some setting or anything so that this doesn’t happen? Thanks
100% work
good work man 😆
It seems everytime I use physical sun and sky, my color will be too bright, any sugestion for me ???
🙁
Thanks a lot ! The Hybrid solution is genious and hadn’t got the head for it
this is so much better than regular image based lighting tanks
Best tutorial I found in the web, thank you!
😀 greatfull!!!!
You are welcome guys, see you in the next tutorial 😉
Your tutorial showed me how to do this, and ive been trying for hours.
Seriously, Thank you.
Thanks!! It’s so helpful, thank you so much
If you use custom env slot for material with single sample env set to 1 and reflection distance you can also reflect entire sky with all reflections including reflections of 3d mesh… 🙂
Yes it could be a good addition for the external method, but you need to create a specific spherical/cylindrical map to make it work nicely. Thx for posting
simply the best
Great!
Love your work.
Another Great Tutorial sir,
you make me want to learn more and more 😉
Any chance if you can post Tuscan Kitchen or milan’s Apartment Tutorials as well??
Antonio, sei grandissimo! Bellissimi capolavori!
Il tuo sito e’ magnifico.
Saluti dalla Svizzera
Grazie per essere passato…troppi complimenti !! 😳
Un saluto!
Hi mates, thanks for the comments!
I start 2 new important works this week, so I think I will be able to publish this tutorial next week! Sorry for the late
Hi Antonio, you managed to achieve a superb environment..peaceful and colourful place! Nicely done!
good sky~~render light l like it .